
Tags
cedar, cedar pergola, flagstone patio, mid-century ranch style house, naturalistic plantings, Texas ice house
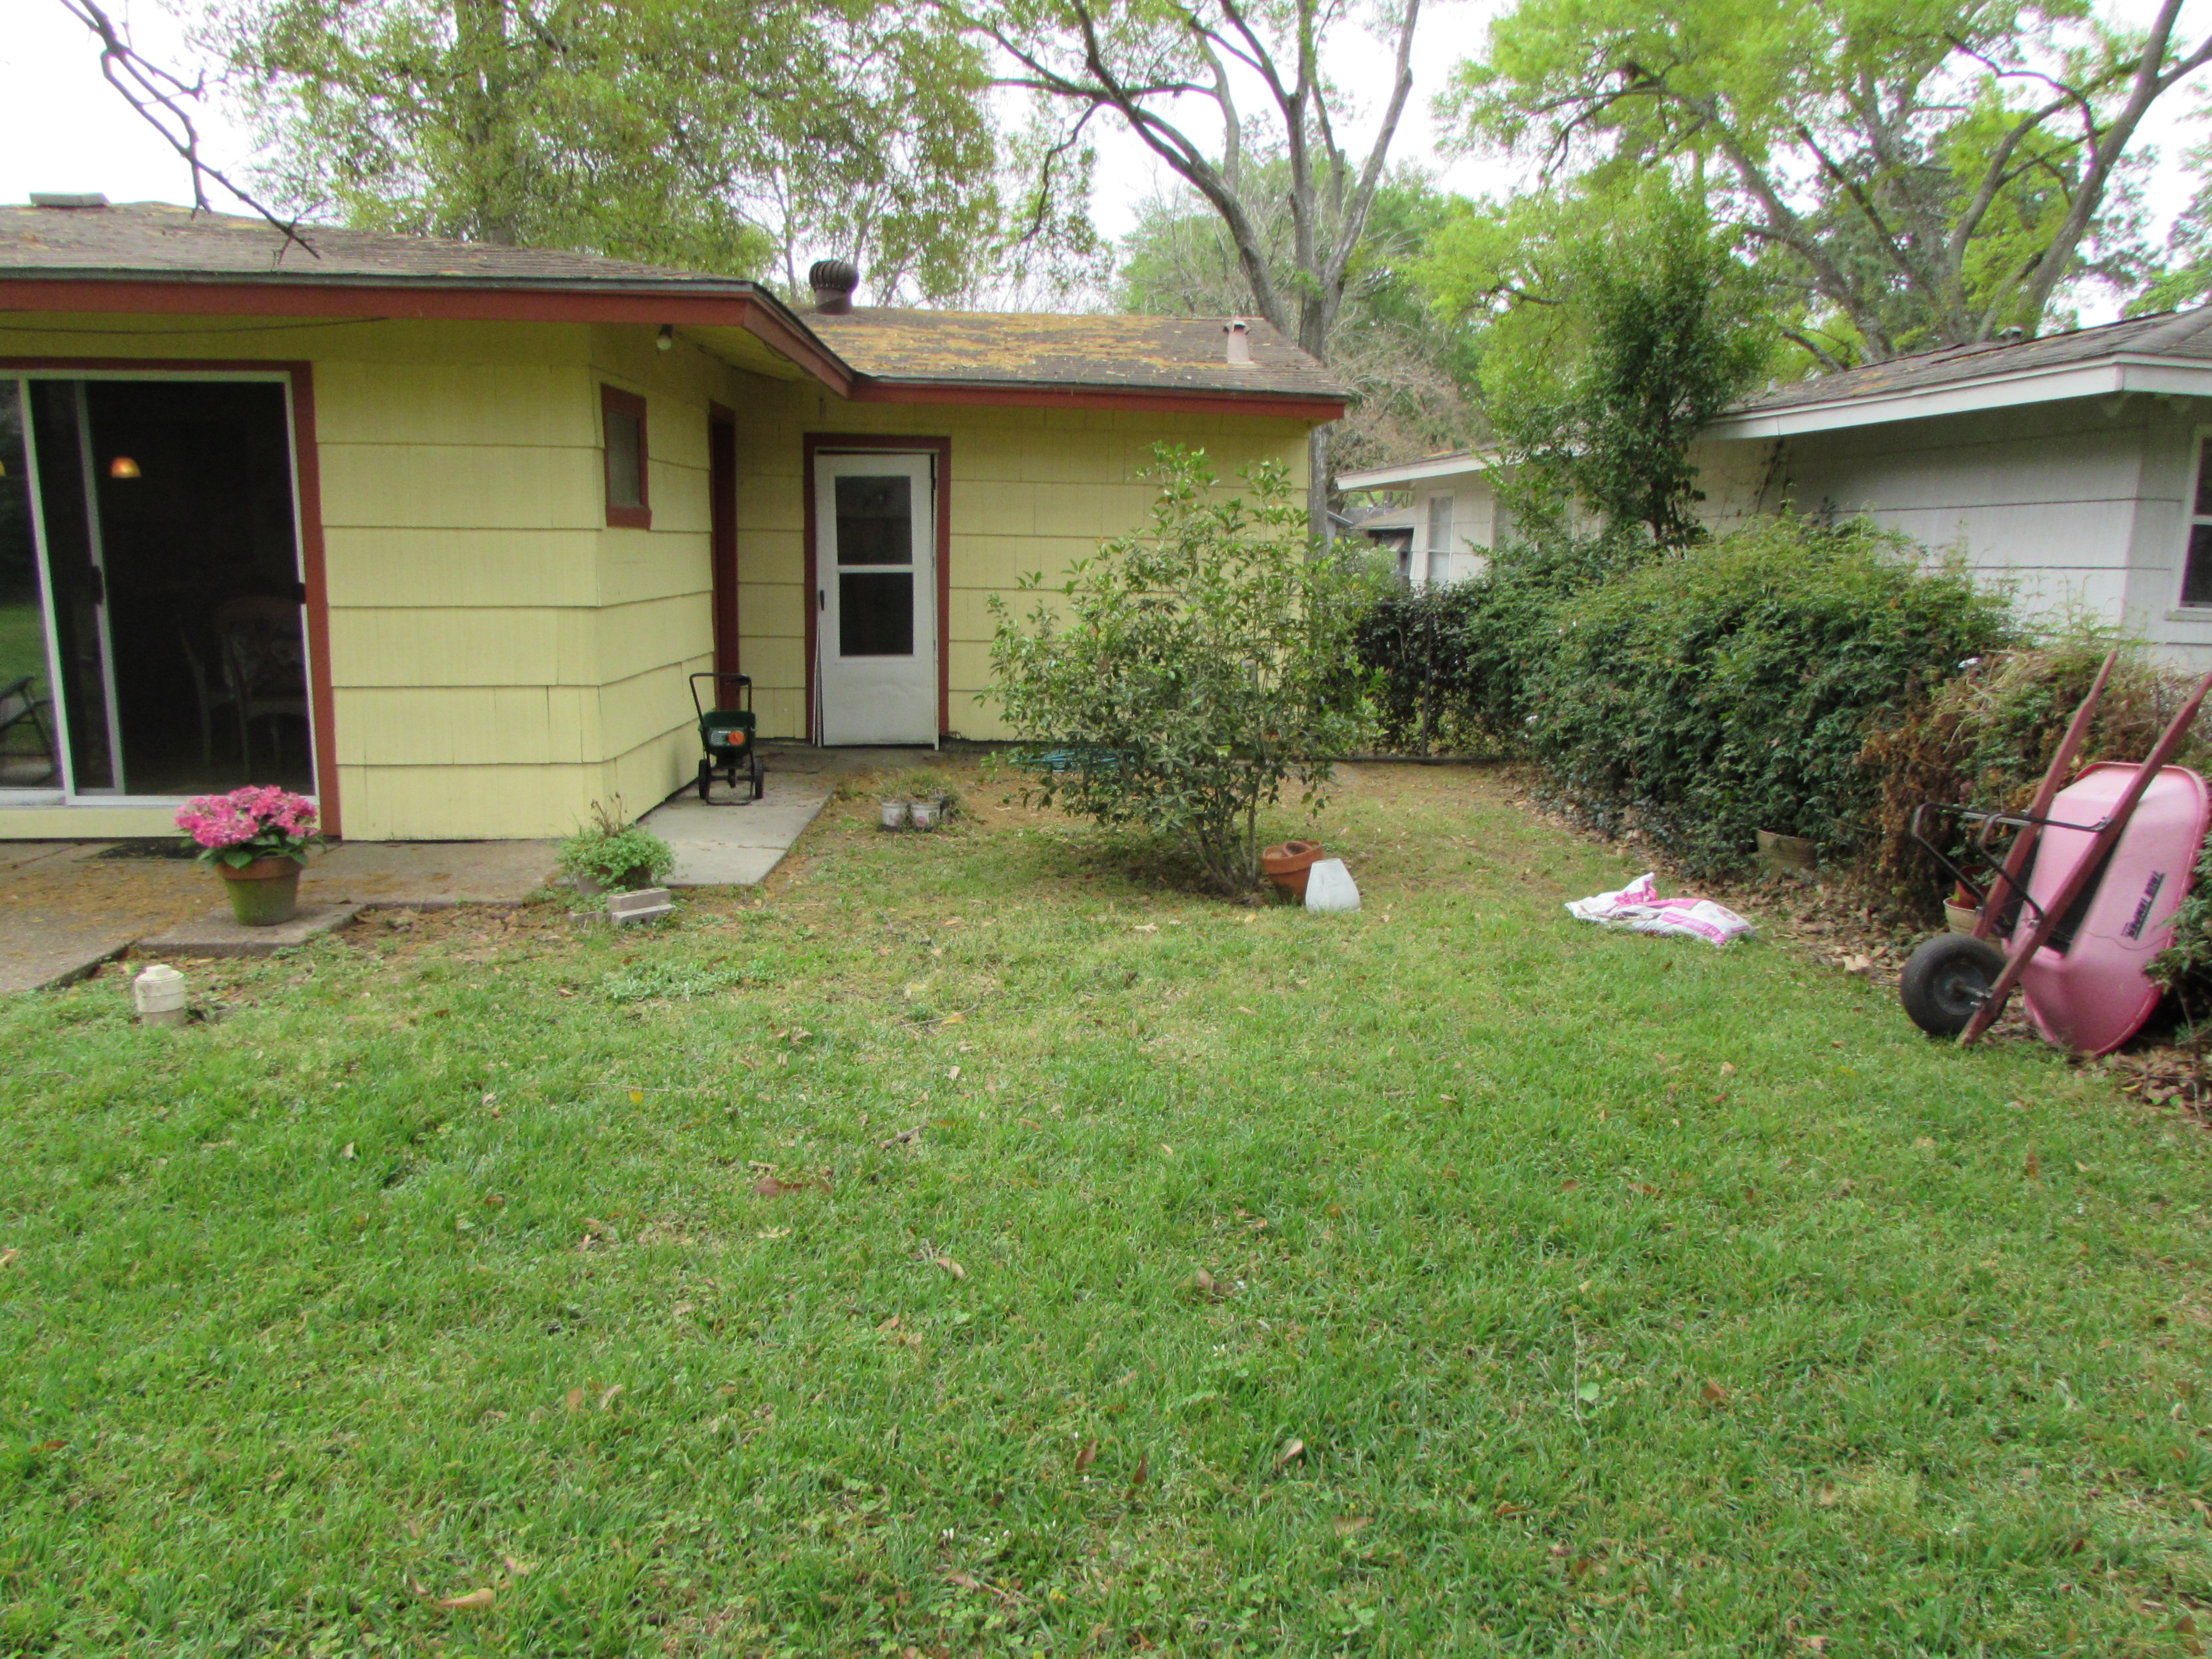
It was time! These empty-nesters decided it was time to update their 1950’s ranch and put in the garden they always wanted. This home is in an area just north of the Heights. The home sits on a very large lot. They wanted more usable spaces, a place to grow veggies, more plants to attract wildlife, and storage. He wanted a place to BBQ and hang out with the feeling of an ice house. She wanted a pretty flower garden that was private and serene. We aim to please and with all that room and a decent budget we were able to accommodate all their needs.
Lots of room and nice mature shade trees.  The view of the neighbors fence was not very interesting and there were lots of volunteer brush. We cleaned it up and added in understory bushes and trees, Vitex, red bud, buddleia, sweetspire, spirea and ornamental grasses.
  Mixed in with that we added a lower layer of plantings, trailing lantana, autumn fern, cooper canyon daisies, salvia greggii, crinum lilies, Louisiana iris, guara and some American wisteria to grow in with a big patch of wisteria that had never bloomed. The fence between the neighbors was and old hurricane fence that had seen better days. Before we started they replaced it with a new cedar fence and moved the A/C around the side. The sunniest place in the yard was on the north so we put the raised bed there. One the south side we planted yaupon hollies, firespike and other shade tolerant plants.
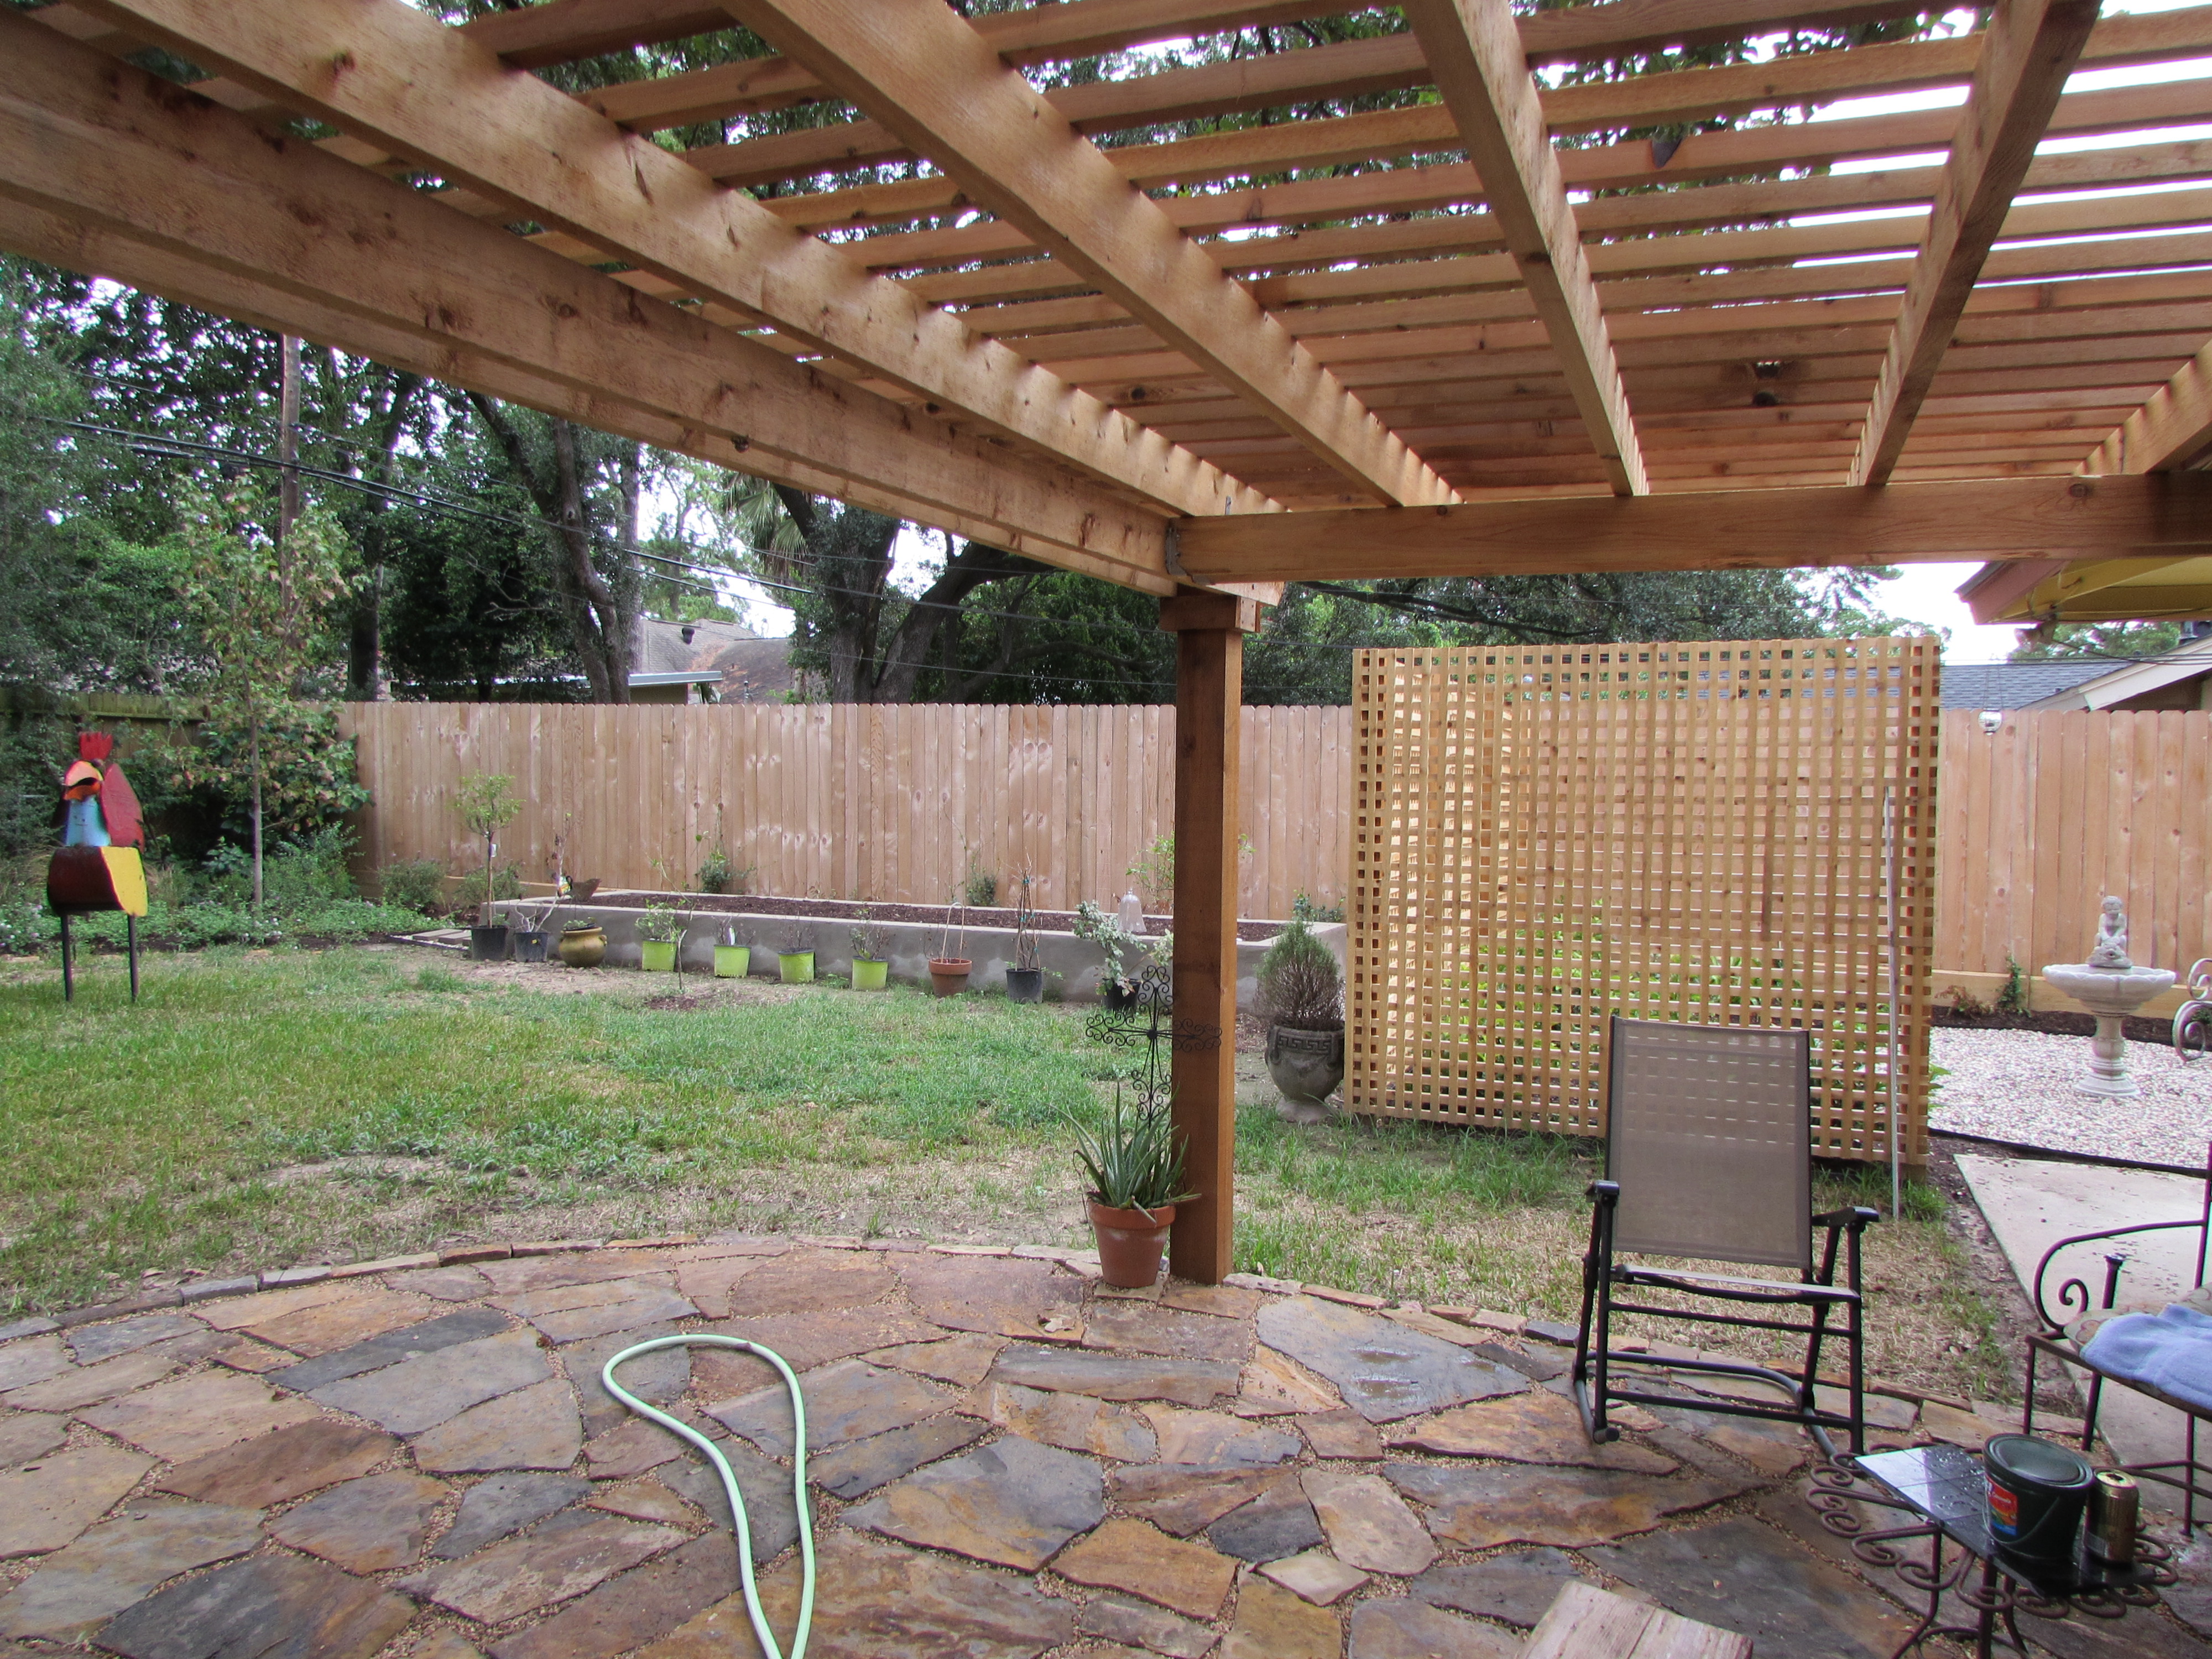
The window above will look out on to the courtyard. This is where we will create a tranquil private space to sit and enjoy peace and quite. We constructed a large patio with a pergola off the back of the house as a place to gather and entertain.

 The space behind the garage was a good spot for a storage area. We decided to keep the Texas Olive and build behind it. The storage area need to be easy to access but visually obscured from the entertaining area. Humidity is an issue in Houston so a cover area with plenty of air flow seemed the right choice.

Site Supervisor!
The clients appreciated how large their yard was and recognized the value in having an automated irrigation system. Houston does get 50+ inches of rain per year but long dry spells can turn our clay soil into something close to cement. Keeping it evenly moist is important if you want the roots to stay healthy. We trench by hand, which minimizes the damage to the surroundings, but we are still left with bare patches when we cover the pipes back up.

Trenches for new irrigation.
We always install a cut-off valve at the beginning of our main line. This allows the client the ability to stop the flow of water to the irrigation system without impeding the water to their home.

Irrigation: Gate Valve
I like to set the posts for our structures as early as we can in a project. Besides giving the concrete time to cure it also helps further delineate the spaces. In this image the pergola posts can be seen offset; the posts near the house have to be moved inward as the existing concrete walk precludes us from squaring these posts with the outer pair.

Starting the wood structures.
I like the use of cleats. These horizontal boards give great support when using long (and heavy) joists. I have seen them used temporarily, but I find them an attractive piece of trim. By installing a cleat at the desired height (plumb and level) you can focus on attaching the tie-beams and not fret about their correct height as they are sitting upon the cleats (which are triple-checked against grade).

Our smaller level on a cleat. Easy to keep in your back pocket and to be on hand when needed.
And here our tie-beams are installed! Notice the single cleat on each of the two outer posts. We will add more a little further into the project. Another limiting factor was the height of the roof’s eave. You can just make out the string-line from the near posts; we left an inch clearance between the top of our beams to the eave (for future access to this board to paint/change).

Posts with first beams.
This mid-century house has a small garage (and that little space is already spoken for) so we needed to create more storage space. Because we wanted to keep with the fun feel, and there are no blind corners to stick a storage building around/behind, we had to come up with a fun structure where bicycles and anything else could be stashed.

Bike shed
The low pitch of the roof keeps the glare of the CGI roof to a minimum.

we were able to keep their existing sweet olive.
I like to build secure structures without over-engineering (see: making heavy) their components. Joist hangers are a great way to make secure butt-joints without adding appreciable weight. Additionally, and I highly recommend this, we use screws instead of nails. They take longer to install but you will not have to worry about them working themselves loose.

Just a little open sky on this side of the shed. This makes for a dryer cover.
The Sweet Olive is peeking through the slats. It had been leaning heavily towards the house (east). Now that the shed is in its path it will learn to look for light elsewhere. The gravel beneath the shed (~3″ thick) provides a low-fuss, and no-muck, pad for storage.

CGI roof is lightweight, inexpensive, and sounds wonderful in the rain.
While we want to mask whatever is stored under the shed we are still security conscious. These open slats ensure that visibility is not compromised. Also, the openwork allows for airflow.

Finished shed. Its roof transfers the house’s rainwater right to this rear bed.
The cleats are all formed on the pergola, the other tie-beams are installed, and the joists are fastened. Next we can work on the patio. The pergola is 18 feet across the face of the house and the post are 11 feet out from the house.

The structures are installed. We just had a few branches to cut above the pergola.
Again, I like to fasten my structures well without any obtrusive devices. Hurricane ties secure the joists to the beam. And the beams from the house are tied into the outer structure via joist hangers. Because we use rough cedar we have to modify our joist hangers slightly to ensure a good fit. These fasteners are manufactured to fit treated lumber and as such are a little small for our cedar.

I like double tie-beams sandwiching the posts. bolting them to the post transfers the weight just fine.
We also were able to install a sizable (24′ long and 6′ wide) raised bed. This area gets great sun all day long and we anticipate many a great vegetable grown here.
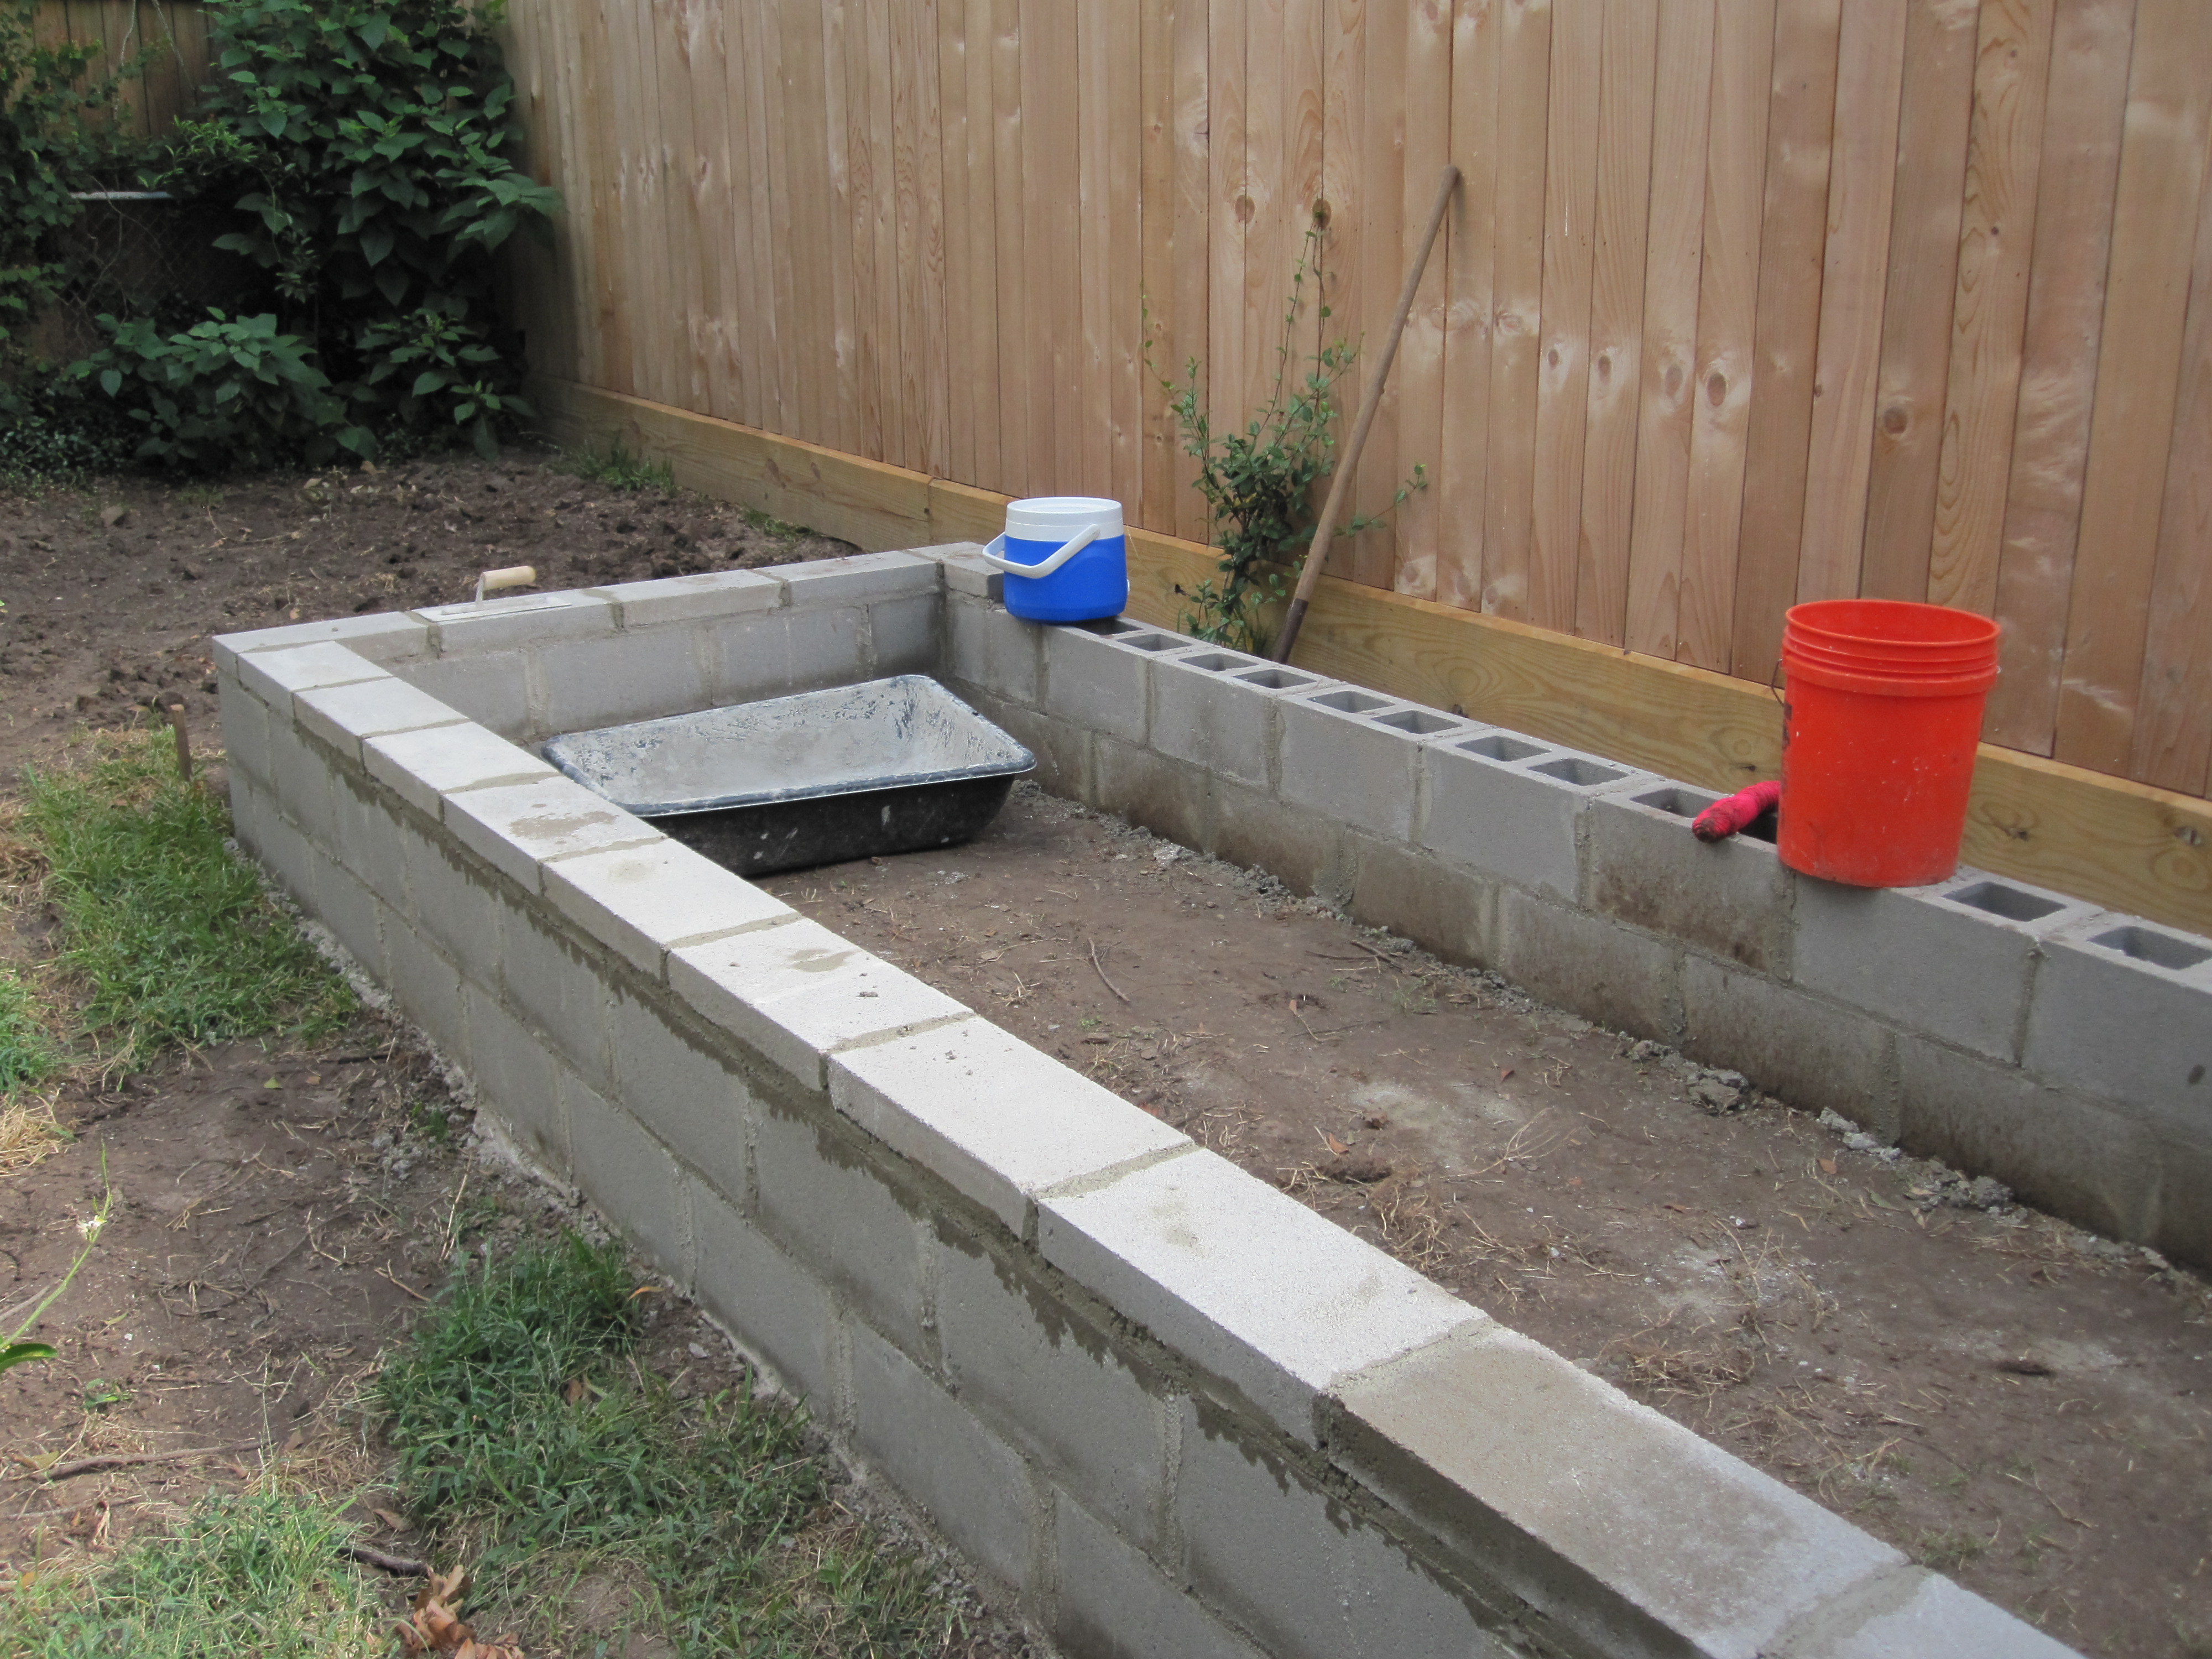
Cinder blocks provide a great way to build.
Once constructed we skim-coat the inside with a concrete slurry creating a vapor barrier.

First side coated and beginning to cure. Be sure to eliminate any excess to keep it from leaching into the soil. The lime is particularly harmful to turf-grass.
We created a small courtyard off of the home-office. The gravel patio is water permeable and allows for future customizations by the owners.

Private Courtyard
A simple screen provides a barrier while the viburnum hedge grows in. This is a space that needs to evolve over time. It needs to patina and there can be more plantings like annuals and bulbs.

Azalea, Crinum Lily and Viburnum will all enjoy the heat and sun.
Our flagstone patio, edged in chopped stone, begins to take shape. The colors of this stone, Smokey Mountain Thick, reflect the colors of the house, helping tie them together.
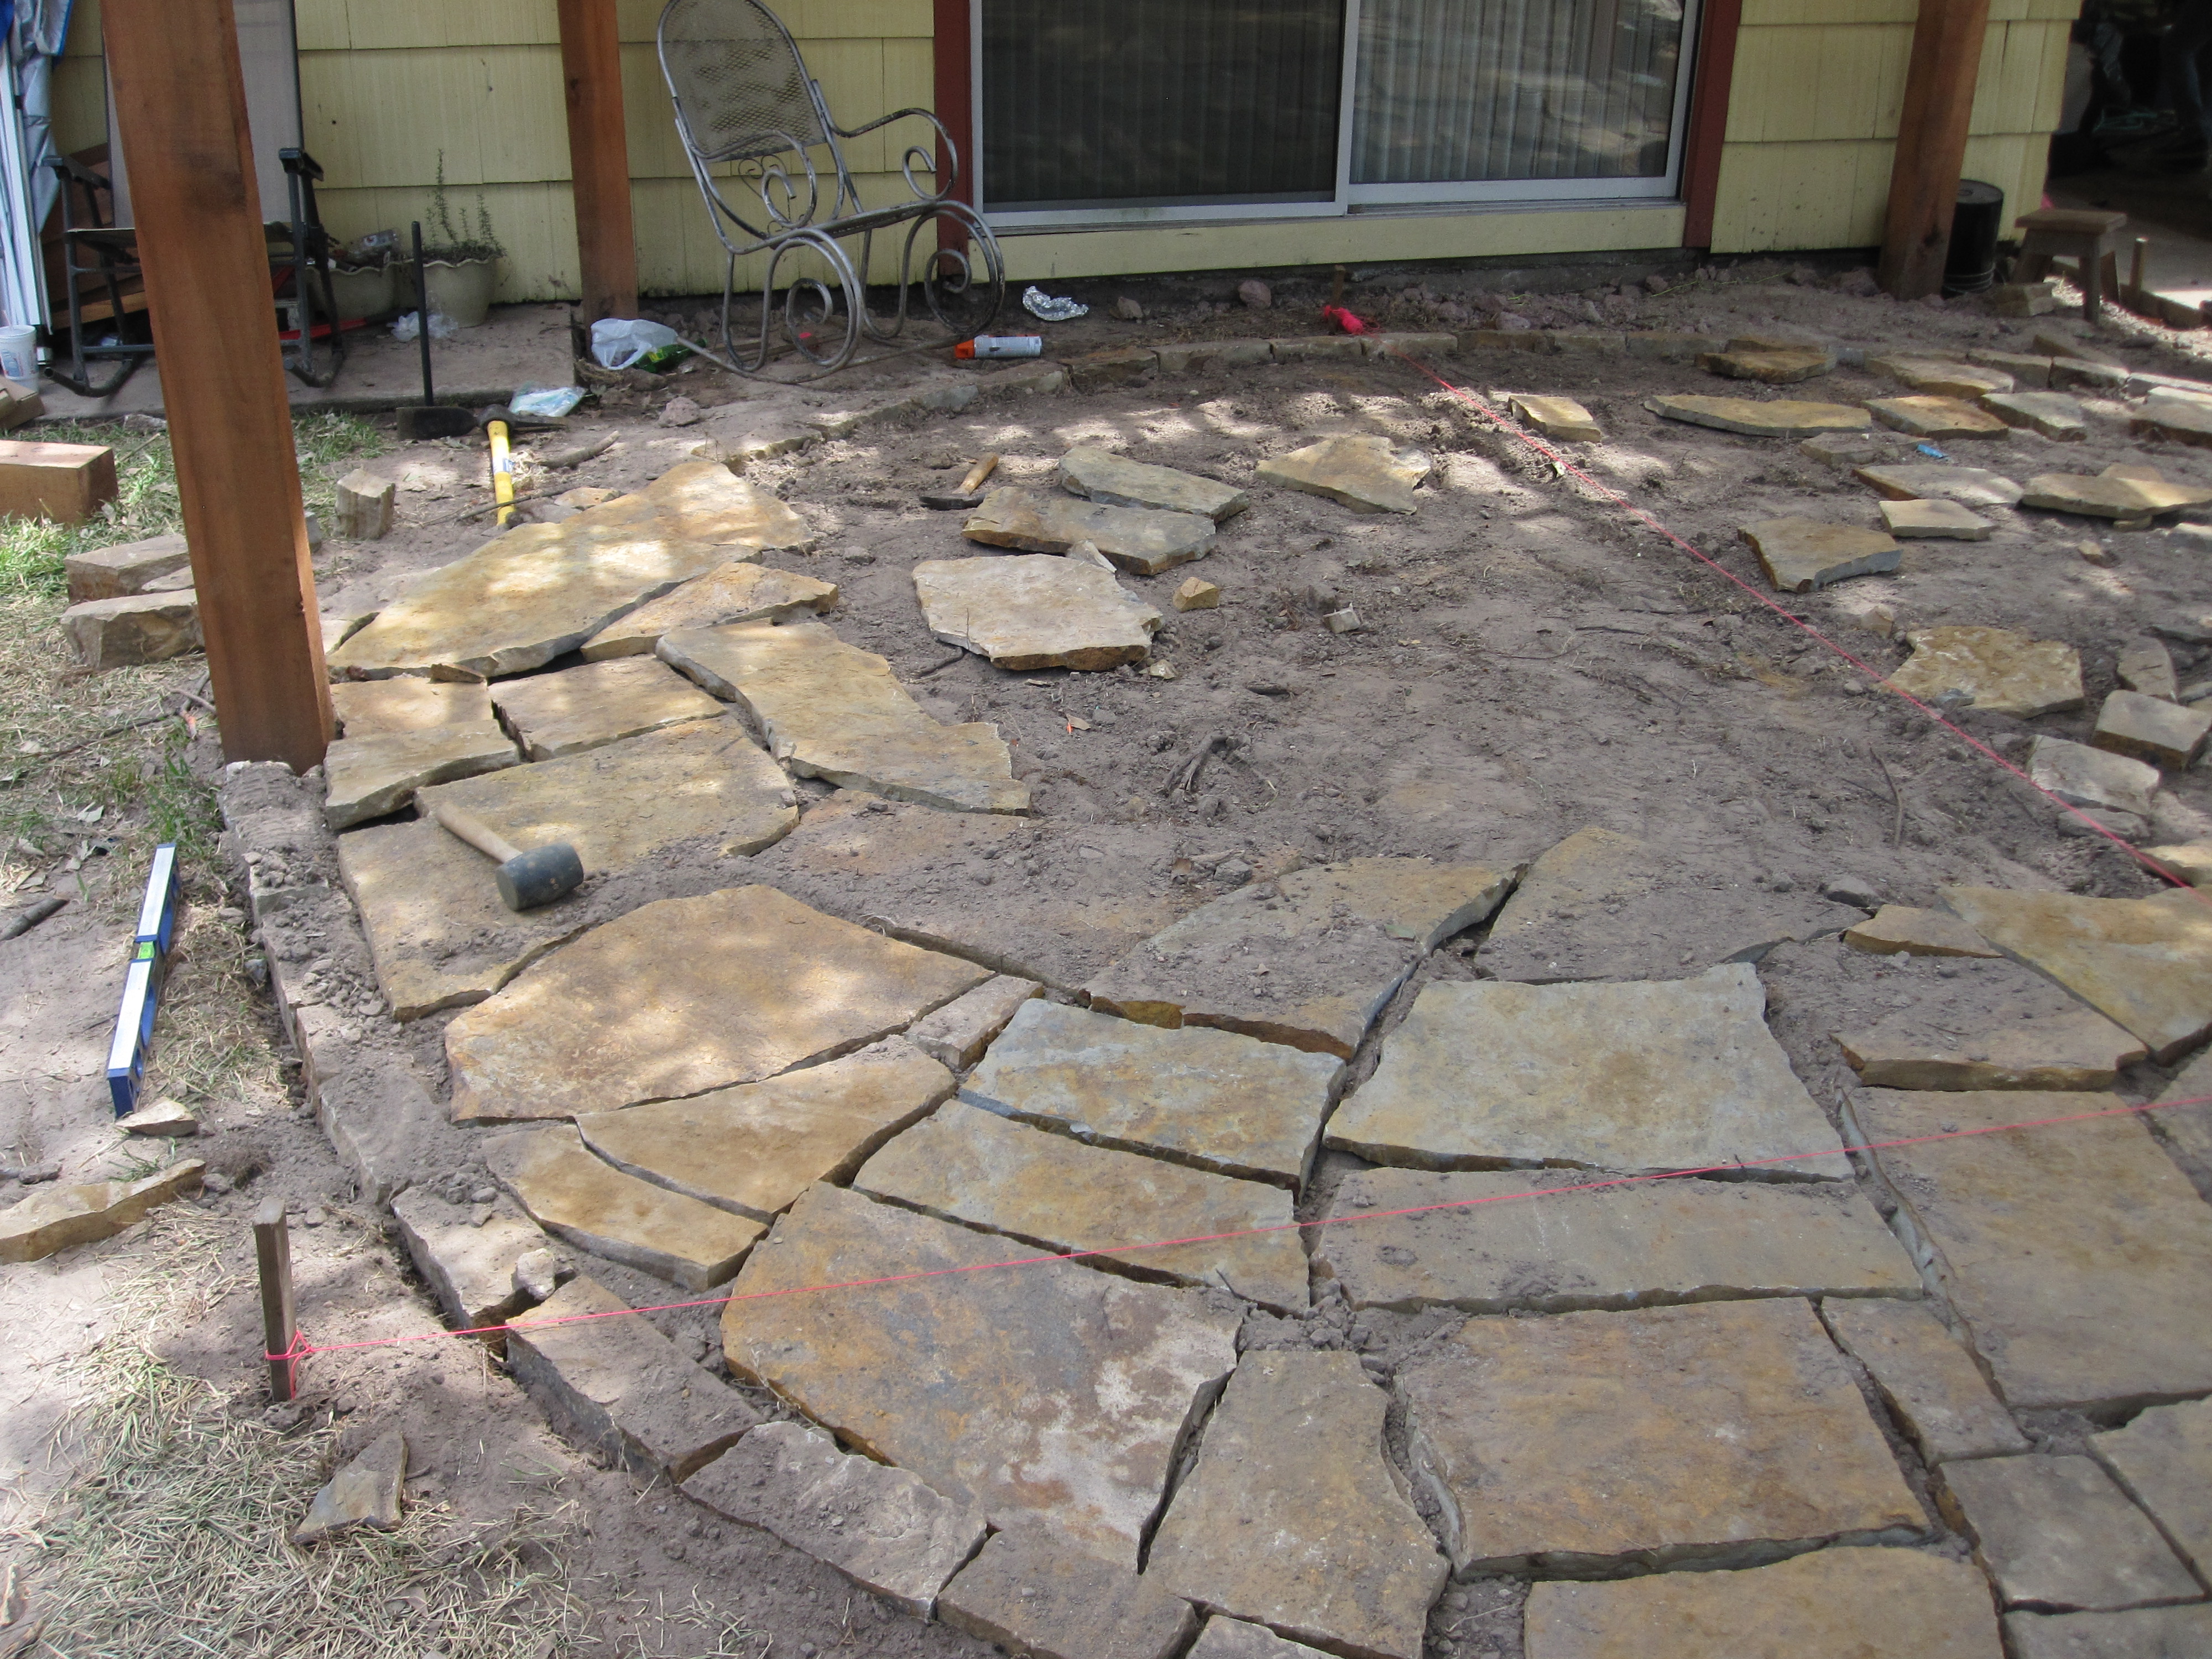
Flagstone cut into dirt.
The patio is about 18′ x 16′. Once infilled with gravel, washed and swept, the beauty of the stone shines through. You can just make out the subtle detail of a complete circle of chop stone, just for fun!

Brushing in pea gravel.

Pot zone was added to the irrigation system to water planters on patio.

Checking back a week later and seeing that furnishings are beginning to appear.
This yard is still quite open but having more defined spaces near the house makes the house seem bigger as you move into the new outdoor spaces (rooms.)
A small fountain is installed in the private courtyard.
The Traveler’s Redbud is tucked in a corner of the yard. A pleasant find when walking the garden.

The lens kept fogging up that is how humid it is here in late summer.
We added a stepping stone path with the extra flagstone. Thinking ahead for grandchildren on an Easter egg hunt or just strolling along the edge. The patio now looks out into a lush woodland thicket that will take little maintenance but be and ever changing nature area that makes you forget that there is a neighbor and not big wood to explore.

The big metal chicken standing with his shovel ready to plant some veggies. He is happy with the improvements.
For more pictures you can check out the Houzz board we did for this project – http://www.houzz.com/projects/711814/little-bit-ice-house-little-bit-meditaion-and-more
This post is in collaboration with Shawn Michael Co-owner of Ravenscourt Landscaping & Design LLC.

Wow! What a beautiful transformation. Great as-you-go photos. The architectural feature blend well with the original design of the house–not too big or overwhelming contemporary. And that curved, stone patio? Drool.
LikeLike
Thank you Tina! I am happy you feel we achieved what I planned : ) I was important to keep the sense of utilitarian and humble so the house and structures could live together as seamlessly as possible. My hope is as it grays it will feel like the patio and pergola and other features have been there since the beginning. And these folks were very laid back and comfortable..and their garden art works perfectly with the rustic charm of the whole garden.
LikeLike
Love it. This might be my favorite, it all blends so well yet leaves room for future changes and additions. It really makes the yard useable and inviting and the storage area was a great idea.
Also great tips throughout the post!
LikeLike
Bittster…funny thing is my husband didn’t think this one would show well. It just isn’t fancy but that was the point. I wish I had a big back garden like this!
LikeLike
Nice changes — shade at the back door, useable patio space, raised beds, definition of garden spaces. I bet they’ll get a lot more use out of their back yard now.
LikeLike
Thank you Pam! It is a really nice large back yard.
LikeLike
These are great ideas!
LikeLike